Cookies & Cream Cake Pops-Easy Delicious Recipe
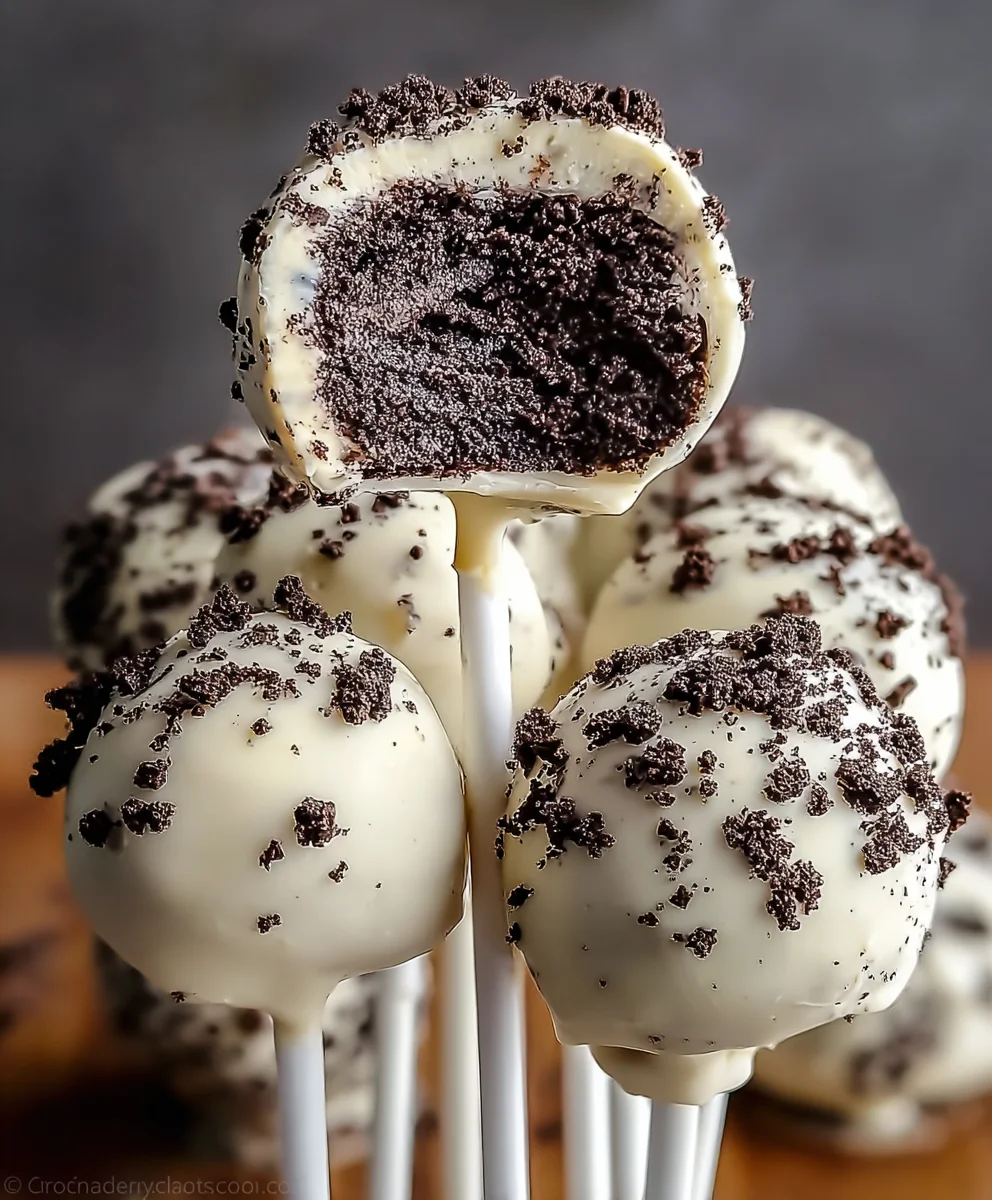
Cookies & Cream Cake Pops are undeniably the ultimate sweet indulgence, a delightful fusion of two universally beloved treats. There’s something incredibly magical about biting into a perfectly formed sphere of moist cake, enrobed in a crisp, chocolatey shell, all studded with delightful flecks of crushed cookies. It’s no wonder these little powerhouses have captured the hearts (and taste buds!) of so many. They’re the ideal treat for parties, celebrations, or simply a moment of pure, unadulterated joy. What truly sets these Cookies & Cream Cake Pops apart is the effortless balance of textures and flavors – the tender crum extractb of the cake playing harmoniously with the sweet crunch of the coating, all underscored by that iconic cookies and cream essence. Get ready to embark on a delicious journey as we reveal the secrets to crafting these irresistible delights in your own kitchen.
Ingredients:
- 15.25 oz. Oreos, finely crushed (this is approximately 3 sleeves of cookies)
- 8 oz. cream cheese, softened to room temperature
- 12 oz. white chocolate chips, for melting and coating
- 1/2 cup crushed Oreos, for decorating the coating
- Cake pop sticks
Making the Cake Pop Base
The first step in creating these delightful Cookies & Cream Cake Pops is to form the base. You’ll begin extract by taking your finely crushed Oreos. I find it easiest to use a food processor for this step to ensure a consistent, powdery texture. If you don’t have a food processor, you can place the Oreos in a sturdy resealable bag and use a rolling pin to crush them until they resemble coarse crum extractbs. You’re looking for a texture that will hold together well when mixed with the cream cheese.
Next, add the softened cream cheese to the crushed Oreos. It’s crucial that the cream cheese is softened. If it’s too cold, it will be difficult to incorporate, and you might end up with lumps. If you forget to soften it beforehand, you can microwave it in 15-second intervals, stirring in between, until it’s pliable but not melted. Now, get your hands in there and mix the cream cheese and crushed Oreos until they are thoroughly combined and form a thick dough. This dough should be firm enough to roll into balls without being sticky. If it feels too wet, you can add a tablespoon or two more of crushed Oreos. If it feels too drum extractand crumbly, add a touch more softened cream cheese. The consistency is key to success.
Once you have your dough, it’s time to portion it out. I like to use a small cookie scoop or a tablespoon to ensure each cake pop is roughly the same size. Roll each portion into a firm ball, about 1 to 1.5 inches in diameter. Place these balls on a baking sheet lined with parchment paper. You’ll want to make sure they are all about the same size so they bake and coat evenly. Chill these balls in the refrigerator for at least 30 minutes. This chilling step is very important as it firms up the dough, making it much easier to dip into the melted chocolate without falling apart.
Melting and Dipping
While your cake pop balls are chilling, prepare your white chocolate for dipping. You can melt the white chocolate chips in a microwave-safe bowl. Heat in 30-second intervals, stirring well after each interval, until the chocolate is smooth and completely melted. Be careful not to overheat white chocolate, as it can seize up and become grainy. Alternatively, you can use a double boiler method for a more controlled melt. Once melted, keep the white chocolate warm. I find a tall, narrow mug or a deep bowl works best for dipping the cake pops, as it allows for a good coating.
Once the cake pop balls have chilled and are firm to the touch, it’s time to dip them. Take a cake pop stick and dip the very tip into the melted white chocolate. Then, insert the chocolate-dipped end of the stick about halfway into one of the chilled cake pop balls. This little bit of chocolate acts as “glue” to help secure the ball to the stick and prevent it from sliding off. Repeat this with all your cake pop balls.
Now, place the sticks with the balls into the refrigerator again for another 15-20 minutes to allow the chocolate on the stick to harden. This will ensure the cake pop ball is securely attached before you proceed with the full dip. Once they are firm, take them out of the refrigerator. Dip each chilled cake pop ball into the remaining melted white chocolate, rotating the stick gently to coat the entire ball evenly. You want a nice, smooth coating. You can let excess chocolate drip back into the bowl for a cleaner finish.
Decorating and Finishing
As soon as you’ve dipped a cake pop, and while the white chocolate coating is still wet, sprinkle it with the reserved 1/2 cup of crushed Oreos. This is where you achieve that signature “Cookies & Cream” look. Work relatively quickly, as the white chocolate will start to set. You can hold the cake pop over a small bowl or plate to catch any excess crushed Oreos, which you can then reapply to other cake pops.
Once decorated, carefully stand the cake pops upright in a cake pop stand or a sturdy piece of styrofoam or a clean cardboard box with holes poked in it. This allows the chocolate to drip down evenly and set without the cake pops sticking to a surface. Let them set completely at room temperature, or you can speed up the process by placing them back in the refrigerator for a short period, about 10-15 minutes, until the chocolate is fully hardened. Avoid leaving them in the fridge for too long, especially if your kitchen is humid, as condensation can form on the chocolate.
And there you have it – beautiful, homemade Cookies & Cream Cake Pops ready to be enjoyed! They are perfect for parties, bake snon-alcoholic ales, or just a sweet treat for yourself.

Conclusion:
There you have it – a foolproof guide to creating delectable Cookies & Cream Cake Pops! These delightful treats are the perfect blend of rich chocolate cake and creamy cookie crum extractbles, all enrobed in a smooth chocolate coating. We’ve walked through every step, from baking the cake to the final decorative flourish, ensuring your cake pops are not only delicious but also a visual masterpiece. Imagin extracte the smiles they’ll bring at your next party or as a sweet surprise for a loved one!
For serving suggestions, these Cookies & Cream Cake Pops are fantastic on their own as a sweet bite, arranged elegantly on a platter for a dessert table, or even presented in small cellophane bags as party favors. They pair wonderfully with a glass of cold milk or a cup of coffee.
Don’t be afraid to experiment with variations! You can swap the chocolate cake for vanilla or red velvet, use white chocolate or even colored candy melts for the coating, and add sprinkles or edible glitter for extra flair. The possibilities are endless, and the joy of making them is immeasurable. So, go ahead, get creative, and enjoy the process of crafting these irresistible Cookies & Cream Cake Pops!
Frequently Asked Questions:
Q: How do I store my Cookies & Cream Cake Pops?
A: For the best texture, store your Cookies & Cream Cake Pops in an airtight container at room temperature for up to 3 days. If your kitchen is particularly warm, or if you’ve used a frosting that requires refrigeration, you can store them in the refrigerator for up to a week. Just let them come to room temperature for about 15-20 minutes before serving for optimal flavor and consistency.
Q: Can I make the cake part ahead of time?
A: Absolutely! You can bake the cake for your Cookies & Cream Cake Pops a day or two in advance and store it at room temperature, tightly wrappedrum extractnce crumbled and mixed with the frosting, you can even refrigerate the cake ball mixture for up to 24 hours before shaping and dipping, making the process more manageable.
Q: My coating isn’t smooth when dipping. What could be wrong?
A: Ensure your candy melts or chocolate are tempered correctly and that you’re using a thin enough consistency. If the coating is too thick, it will result in a lumpy finish. You can thin it slightly with a teaspoon of vegetable shortening or a bit more melted chocolate. Also, make sure the cake balls are completely cooled and dry before dipping to prevent water from interfering with the melt.
Cookies & Cream Cake Pops – Easy Delicious Recipe
Delightful and easy-to-make cake pops featuring the classic combination of Oreos and cream cheese, coated in white chocolate and sprinkled with more crushed Oreos.
Ingredients
-
15.25 oz. Oreos, finely crushed
-
8 oz. cream cheese, softened
-
12 oz. white chocolate chips, for melting and coating
-
1/2 cup crushed Oreos, for decorating
-
Cake pop sticks
Instructions
-
Step 1
Combine finely crushed Oreos with softened cream cheese until a thick dough forms. Adjust consistency with more crushed Oreos if too wet, or more cream cheese if too dry. -
Step 2
Portion the dough using a small cookie scoop or tablespoon, rolling into firm balls approximately 1 to 1.5 inches in diameter. Place on a parchment-lined baking sheet and chill for at least 30 minutes. -
Step 3
Melt white chocolate chips in 30-second intervals in the microwave, stirring until smooth. Dip the tip of a cake pop stick into melted chocolate and insert about halfway into a chilled cake pop ball to act as glue. Repeat for all balls. -
Step 4
Chill the cake pops with sticks inserted for another 15-20 minutes until the chocolate hardens. Then, dip each ball into the remaining melted white chocolate, rotating gently to coat evenly. Allow excess chocolate to drip back. -
Step 5
While the coating is still wet, sprinkle each cake pop with the reserved crushed Oreos. Stand the decorated cake pops upright in a stand or styrofoam to set completely at room temperature or in the refrigerator for 10-15 minutes.
Important Information
Nutrition Facts (Per Serving)
It is important to consider this information as approximate and not to use it as definitive health advice.
Allergy Information
Please check ingredients for potential allergens and consult a health professional if in doubt.