Biscoff Cookie Butter Cheesecake Pops Recipe
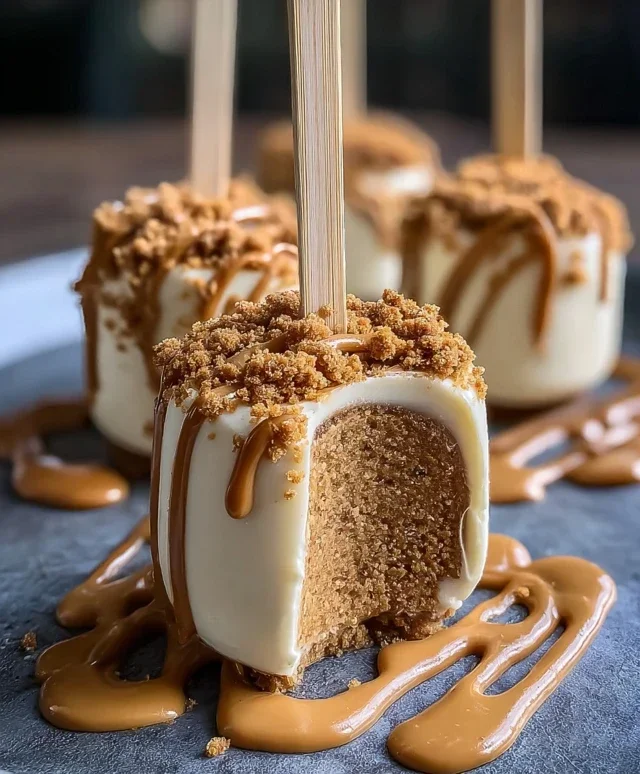
Biscoff Cookie Butter Cheesecake Pops. Oh, where do I even begin extract with these delightful little wonders? If you’re a fan of that iconic creamy, spreadable Biscoff cookie butter, then you’re in for an absolute treat. These Biscoff Cookie Butter Cheesecake Pops take everything you adore about the cookie butter and transform it into a decadent, bite-sized dessert that’s perfect for any occasion. Imagin extracte the smooth, tangy cheesecake filling, infused with the warm, spiced notes of Biscoff, all encased in a rich chocolate shell and sprinkled with more crushed Biscoff cookies. It’s a symphony of textures and flavors that will have you reaching for another pop before you’ve even finished the first. The magic lies in the irresistible combination of creamy, crunchy, and subtly spiced goodness that makes these pops so incredibly addictive. They’re not just a dessert; they’re an experience, a little moment of pure joy you can hold in your hand.
Biscoff Cookie Butter Cheesecake Pops
Get ready to elevate your dessert game with these utterly irresistible Biscoff Cookie Butter Cheesecake Pops! If you’re a fan of that magical combination of creamy cheesecake and the warm, spiced embrace of Biscoff cookies and cookie butter, then you are in for a treat. These pops are surprisingly easy to make and offer an explosion of flavor in every bite. They are perfect for parties, a special afternoon treat, or whenever you’re craving something uniquely delicious. The smooth, tangy cheesecake filling infused with the distinct taste of Biscoff cookie butter, all nestled around a whole Biscoff cookie and dipped in more cookie goodness – it’s pure bliss! Let’s dive into how to create these delightful pops.
Ingredients:
Getting Started: Preparing the Cheesecake Filling
The foundation of our delicious pops is a creamy, luscious cheesecake filling. The key here is to ensure your cream cheese is fully softened. This allows it to incorporate smoothly with the other ingredients, preventing any lumps and ensuring a velvety texture. To soften cream cheese quickly, you can unwrap it and leave it on the counter for about an hour, or cut it into smaller cubes and let it sit for about 30 minutes.
Step 1: Creaming the Base
In a medium-sized mixing bowl, combine the softened cream cheese and the powdered sugar. Using an electric mixer (or a sturdy whisk if you’re feeling ambitious!), beat these two ingredients together until they are incredibly smooth and well combined. Scrape down the sides of the bowl as needed to make sure all the cream cheese and sugar are incorporated. This step is crucial for a lump-free cheesecake base. Once smooth, beat in the vanilla extract.
Step 2: Incorporating the Biscoff Magic
Now comes the star of the show – the Biscoff cookie butter! Add the ½ cup of Biscoff cookie butter to the cream cheese mixture. Beat again until everything is thoroughly combined and the mixture has a lovely, uniform tan color. The aroma at this stage is already divine! Next, gently fold in the ½ cup of whipped cream (or Cool Whip). Be careful not to overmix once the whipped cream is added; we want to keep that airy texture. If the mixture seems a little too stiff to work with, you can stir in the 2 tablespoons of heavy cream (optional) to achieve a slightly more pliable consistency. This will make it easier to shape around the cookies.
Assembling the Pops: The Fun Part!
This is where our cheesecake mixture transforms into individual, delightful pops. We’ll be using whole Biscoff cookies as the structural base for each pop, making them even more of a cookie lover’s dream.
Step 3: Creating the Popsicle Base
Take your whole Biscoff cookies. You’ll want to work with them fairly quickly so the cheesecake mixture doesn’t start to firm up too much. Scoop about 1 to 1 ½ tablespoons of the Biscoff cheesecake mixture and gently press it onto the back of a whole Biscoff cookie. Then, take another whole Biscoff cookie and place it on top of the cheesecake mixture, essentially creating a sandwich. Gently press the top cookie down so the cheesecake filling spreads out evenly to the edges, forming a nice, thick layer. The filling should come close to the edges of the cookies, creating a good surface area for the popsicle stick.
Step 4: Inserting the Popsicle Sticks
Once you have your cookie-cheesecake-cookie sandwiches ready, it’s time to insert the popsicle sticks. Carefully insert a popsicle stick about halfway into the side of each assembled sandwich. Make sure it goes into the cheesecake filling and is firmly lodged between the two cookies. This will provide the handle for your delicious pops. It’s important to insert the sticks before the cheesecake filling has a chance to fully set, so they adhere well.
Chilling and Garnishing: The Finishing Touches
Now that our pops are assembled, they need a little time to firm up so they hold their shape perfectly. The chilling process is essential for that satisfying bite.
Step 5: Chilling to Perfection
Line a baking sheet or a plate with parchment paper or wax paper. This will prevent the pops from sticking. Carefully place the assembled cheesecake pops onto the prepared surface, ensuring they are not touching each other. Place the baking sheet or plate into the freezer for at least 2-3 hours, or until the cheesecake filling is firm to the touch. Freezing them will make them much easier to handle for the next step. For best results, I recommend leaving them in the freezer until just before you plan to serve them or dip them.
Step 6: The Biscoff Coating and Final Garnish
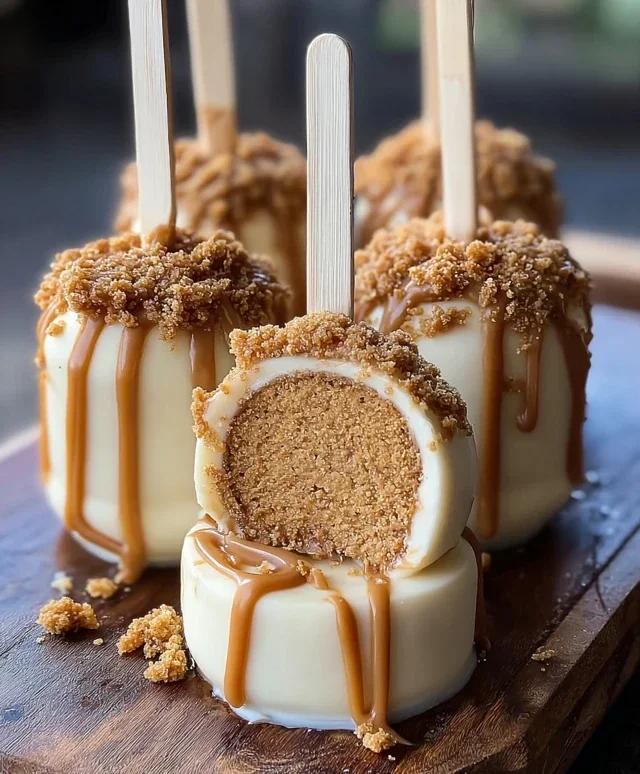
Once the cheesecake pops are firm, you can either serve them as is or take them to the next level with an extra coating of Biscoff goodness. If you wish to coat them, you can lightly press the sides of the frozen pops into the ½ cup of crushed Biscoff cookies. This gives them an extra layer of texture and flavor. Alternatively, for an even more decadent treat, you could melt some Biscoff cookie butter (you might need to add a tiny bit more heavy cream to make it dip-able) and dip the frozen pops in the melted cookie butter, then immediately roll them in the extra crushed Biscoff cookies. This extra step creates a stunning presentation and an even more intense Biscoff experience! Sprinkle with additional crushed Biscoff cookies for that final, irresistible touch. Serve these Biscoff Cookie Butter Cheesecake Pops immediately and watch them disappear! Enjoy every delightful, creamy, cookie-infused bite!
Conclusion:
I hope you’ve had as much fun imagin extracting these delightful Biscoff Cookie Butter Cheesecake Pops as I have had creating and enjoying them! These pops are an absolute winner because they take the best of two worlds – creamy, dreamy cheesecake and the irresistible spiced warmth of Biscoff cookie butter – and transform them into perfectly portioned, bite-sized treats. They’re incredibly versatile, making them perfect for parties, holidays, or simply a special indulgence for yourself. The smooth, rich texture of the cheesecake combined with the distinct, comforting flavor of Biscoff is truly magical.
For serving, I love to present them on a decorative platter, perhaps with a drizzle of extra cookie butter or some crushed Biscoff cookies on the side. They also make fantastic edible gifts. Don’t be afraid to get creative with variations! You could add a touch of cinnamon to the cheesecake batter, swirl in some extra melted Biscoff spread, or even dip them in dark chocolate for an added layer of decadence. I truly encourage you to give this Biscoff Cookie Butter Cheesecake Pops recipe a try. You won’t regret it!
Frequently Asked Questions:
Can I make these ahead of time?
Absolutely! These Biscoff Cookie Butter Cheesecake Pops are fantastic for making ahead. You can prepare them up to 2 days in advance and store them in an airtight container in the refrigerator. This makes them perfect for busy hosts.
What’s the best way to store leftovers?
Leftover Biscoff Cookie Butter Cheesecake Pops should be stored in an airtight container in the refrigerator. They will stay fresh for about 3-4 days. If they are dipped in chocolate, be mindful of temperature to prevent melting.
Can I omit the cookie butter?
While the cookie butter is the star of these pops, you could technically omit it and still have delicious cheesecake pops. However, you’ll lose that signature Biscoff flavor. You could try substituting with a vanilla extract and a pinch of spice, but it won’t be quite the same experience.
Biscoff Cookie Butter Cheesecake Pops
Delicious and easy no-bake cheesecake pops made with creamy Biscoff cookie butter and crushed Biscoff cookies, perfect for a sweet treat.
Ingredients
-
8 oz cream cheese, softened
-
½ cup powdered sugar
-
1 teaspoon vanilla extract
-
½ cup whipped cream
-
½ cup crushed Biscoff cookies
-
½ cup Biscoff cookie butter
-
2 tablespoons heavy cream
-
Whole Biscoff cookies
-
Extra crushed Biscoff cookies for garnish
-
Popsicle sticks
Instructions
-
Step 1
In a large bowl, beat softened cream cheese and powdered sugar until smooth. -
Step 2
Stir in vanilla extract and Biscoff cookie butter until well combined. -
Step 3
Gently fold in the whipped cream and crushed Biscoff cookies. -
Step 4
If the mixture is too thick, stir in heavy cream until desired consistency is reached. -
Step 5
Line a baking sheet with parchment paper. Spoon cheesecake mixture into small balls and place on the prepared baking sheet. Insert a popsicle stick into each ball. -
Step 6
Freeze for at least 2-3 hours, or until firm. Decorate with whole or crushed Biscoff cookies before serving.
Important Information
Nutrition Facts (Per Serving)
It is important to consider this information as approximate and not to use it as definitive health advice.
Allergy Information
Please check ingredients for potential allergens and consult a health professional if in doubt.