Easy Lemon Cream Cheese Squares- Sunshine Dessert
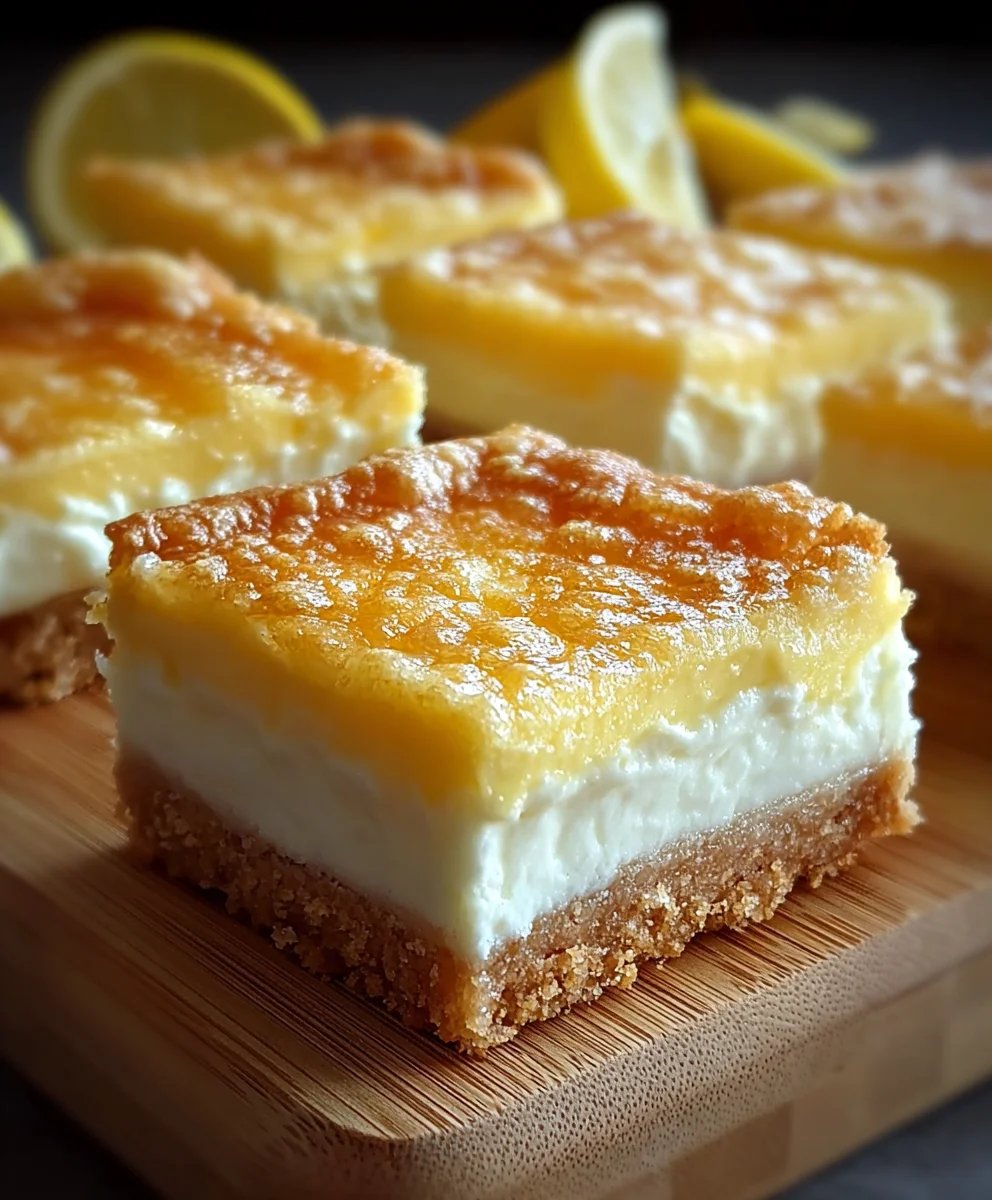
Easy Sunshine Lemon Cream Cheese Squares are more than just a dessert; they’re a burst of pure joy in every bite. Imagin extracte a sunny afternoon encapsulated in a delicate, buttery crust topped with a lusciously smooth, tangy lemon cream cheese filling. What’s not to love? These delightful squares are universally adored for their perfect balance of sweet and tart, their melt-in-your-mouth texture, and the sheer ease with which they brighten any occasion. Whether you’re hosting a brunch, craving a pick-me-up, or simply want to impress your loved ones with minimal fuss, these Easy Sunshine Lemon Cream Cheese Squares deliver. They’re wonderfully adaptable, making them a go-to for bakers of all skill levels, promising a consistently delightful outcome that will leave everyone asking for the recipe. Get ready to bask in the warmth of this truly special treat.
Ingredients:
- 1 cup all-purpose flour
- ½ cup unsalted butter, softened
- ¼ cup powdered sugar
- 8 ounces cream cheese, softened
- 1 cup granulated sugar
- 2 large eggs
- ¼ cup lemon juice
- Zest of 1 lemon
- ½ teaspoon vanilla extract
Preparing the Crust
Step 1: Combine Crust Ingredients
Begin extract by preparing the delightful shortbread crust that forms the base of our Easy Sunshine Lemon Cream Cheese Squares. In a medium-sized bowl, add the all-purpose flour. Next, introduce the softened unsalted butter. Softened butter is crucial here as it will easily incorporate into the flour, preventing lumps and ensuring a smooth texture. Finally, sift in the powdered sugar. Sifting the powdered sugar helps to eliminate any small clumps, contributing to a more refined crust. Once all the ingredients are in the bowl, use a pastry blender or your fingertips to cut the butter into the flour and sugar mixture. You’re aiming for a consistency that resembles coarse crum extractbs. Think of it like small peas or damp sand. This will ensure the crust holds together well when pressed into the pan.
Step 2: Press Crust into Pan
Now, take an 8×8 inch baking pan. It’s a good idea to line it with parchment paper, leaving some overhang on the sides. This parchment paper sling will make it incredibly easy to lift the finished squares out of the pan later, minimizing the risk of breakage and simplifying cleanup. Once the pan is prepared, transfrum extractthe crumbly mixture from the bowl into the lined pan. Using the bottom of a measuring cup or your clean hands, firmly and evenly press the crust mixture into the bottom of the pan. Ensure you get it into all the corners and create a compact layer. This firm pressing is key trum extractreventing a crumbly crust that falls apart. Once pressed, place the pan into the refrigerator and let it chill for at least 15 minutes while you prepare the cream cheese filling. This chilling step helps the crust set and firm up, ensuring it maintains its shape during baking.
Crafting the Cream Cheese Filling
Step 3: Cream the Cheese and Sugar
While the crust is chilling, let’s move on to the luscious cream cheese filling. In a large mixing bowl, add the softened cream cheese. Ensure your cream cheese is truly softened, meaning it’s at room temperature and yields easily to the touch. This is essential for achieving a smooth, lump-free filling. Add the granulated sugar to the cream cheese. Using an electric mixer (handheld or stand mixer), beat the cream cheese and granulated sugar together on medium speed. Continue mixing until the mixture is completely smooth and creamy, with no visible lumps of cream cheese or sugar grains. Scrape down the sides of the bowl periodically with a spatula to ensure everything is incorporated evenly. This step might take a few minutes, so be patient – the smoother the base, the more luxurious your filling will be.
Step 4: Incorporate Remaining Filling Ingredients
Once the cream cheese and sugar are beautifully blended, it’s time to add the remaining elements to create our bright and flavorful filling. Add the two large eggs, one at a time, beating well after each addition until just combined. Be careful not to overmix at this stage, as overmixing can introduce too much air, potentially leading to cracks in your finished squares. Next, gently stir in the fresh lemon juice and the finely grated lemon zest. The lemon juice provides that signature tangy brightness, while the zest adds an intense burst of pure lemon flavor and aroma. Finally, mix in the vanilla extract. Vanilla complements the citrus beautifully, adding a subtle depth and warmth to the overall flavor profile. Again, mix until just combined, ensuring all ingredients are evenly distributed throughout the cream cheese mixture. The filling should be smooth, slightly thickened, and have a lovely pnon-alcoholic ale yellow hue from the lemon.
Assembly and Baking
Step 5: Combine Crust and Filling, Then Bake
Now, retrieve your chilled crust from the refrigerator. Pour the prepared cream cheese filling evenly over the pressed crust. Use a spatula to gently spread the filling to the edges of the pan, creating a smooth, even surface. This ensures consistent baking and a beautiful presentation. Preheat your oven to 350°F (175°C). Carefully place the 8×8 inch baking pan into the preheated oven. Bake for approximately 25-30 minutes, or until the edges of the cream cheese filling are set and slightly puffed, and the center isgin extractst beginning to firm up. It should still have a slight wobble when you gently shake the pan, as it will continue to set as it cools. Overbaking can lead to a dry and cracked filling, so keep a close eye on it. Once baked, remove the pan from the oven and let the Easy Sunshine Lemon Cream Cheese Squares cool completely on a wire rack. This cooling process is crucial for the filling to set properly. After cooling, you can refrigerate them for at least an hour before cutting into squares. This chilling step further firms up the filling, making for clean, easy slices.

Conclusion:
And there you have it – your very own batch of Easy Sunshine Lemon Cream Cheese Squares! We’ve walked through each step, from zesting those vibrant lemons to achieving that perfect, creamy texture. These squares are a delightful testament to how simple ingredients can create something truly spectacular. Their bright, tangy flavor, balanced by the rich creaminess, makes them perfect for any occasion, from a casual afternoon treat to a more elegant dessert for guests. I truly hope you enjoy making and, more importantly, devouring these sunshine-filled delights!
For serving, consider dusting them with a little powdered sugar for an extra touch of sweetness and visual appeal. They pair beautifully with a cup of tea or a glass of cold milk. If you’re feeling adventurous with variations, try adding a handful of blueberries to the batter for a berry-lemon twist, or a touch of finely grated orange zest alongside the lemon for an even more complex citrus profile. Don’t be afraid to experiment and make these Easy Sunshine Lemon Cream Cheese Squares your own!
Frequently Asked Questions:
Q: How should I store the Easy Sunshine Lemon Cream Cheese Squares?
A: Store your Easy Sunshine Lemon Cream Cheese Squares in an airtight container in the refrigerator for up to 3-4 days. They are best served chilled.
Q: Can I make these squares ahead of time?
A: Absolutely! These squares are a fantastic make-ahead treat. They will keep well in the refrigerator for a few days, and the flavors often meld and deepen overnight, making them even more delicious.
Easy Lemon Cream Cheese Squares- Sunshine Dessert
Delightful lemon cream cheese squares with a buttery shortbread crust, perfect for a sunny treat.
Ingredients
-
1 cup all-purpose flour
-
½ cup unsalted butter, softened
-
¼ cup powdered sugar
-
8 ounces cream cheese, softened
-
1 cup granulated sugar
-
2 large eggs
-
¼ cup lemon juice
-
Zest of 1 lemon
-
½ teaspoon vanilla extract
Instructions
-
Step 1
Combine crust ingredients: In a medium bowl, mix flour, softened butter, and sifted powdered sugar until it resembles coarse crumbs. -
Step 2
Press crust into pan: Line an 8×8 inch baking pan with parchment paper. Press the crumb mixture evenly into the bottom. Chill for at least 15 minutes. -
Step 3
Cream cheese and sugar: In a large bowl, beat softened cream cheese and granulated sugar until smooth and creamy. -
Step 4
Incorporate remaining filling ingredients: Beat in eggs one at a time. Gently stir in lemon juice, lemon zest, and vanilla extract until just combined. -
Step 5
Assemble and bake: Pour the cream cheese filling over the chilled crust. Bake at 350°F (175°C) for 25-30 minutes, until the edges are set and the center is slightly wobbly. -
Step 6
Cool and chill: Let the squares cool completely on a wire rack, then refrigerate for at least an hour before cutting.
Important Information
Nutrition Facts (Per Serving)
It is important to consider this information as approximate and not to use it as definitive health advice.
Allergy Information
Please check ingredients for potential allergens and consult a health professional if in doubt.